Do you know your backpack can contain more than it does right now? If well-packed, all your stuffs will definitely fit right in. You see memes giving you impression of a backpack containing endless object. The traveler keeps bringing out objects without end—like it is coming from a bottomless pit. Even though it may not be exactly right, the backpack can mimic that scenario if packed properly.
For your outdoor activities, your backpack plays a significant role to hold all your stuff in one place so you can safely store it in the trunk of your car. For a trip into the wilderness, your pack will hold essentials such as your tent, food, sleeping bag, and other items that you could carry on your back for several miles. Over packing is not the thing here, but rather packing the things that are needed for your trip to be delightful.
| Name | Product | |
|---|---|---|
| Sleepingo | Sleeping Bag | PRICING |
| Teton Hiker3700 | Internal Frame Backpack | PRICING |
| A.L.I.C.E. | External Frame Backpack | PRICING |
| TETON Sports Mammoth | Sleeping Bag | PRICING |
| Duluth Pack Wanderer | Hiking Daypacks | PRICING |
| High Sierra Appalachian 75 | Internal Frame Backpack | PRICING |
| Mardingtop | Internal Frame Backpack | PRICING |
| Kelty Coyote 65 | Internal Frame Backpack | PRICING |
| Kelty Trekker | External Frame Backpack | PRICING |
| Outdoor Research Mesh Ditty Sacks | Stuff Sacks | PRICING |
Sleeping bags is one of the things that could inconvenient you in a backpacker essential kit, but attaching it properly to your backpack makes it easy to carrying around. There is even the possibility of having multiple sleeping bags. How do you go about attaching them around so they don’t inconvenient you?
Achieving this goal shouldn’t be much of a hassle. Tie the sleeping bag to the backpack using a strap and the pack loops. It is easy, right? If that were true, there would be no need for writing this article—I will be done, and over with this article at this point. But the truth is that not all backpack features these accessories, and that is the reason for this guide. So let dive into it!
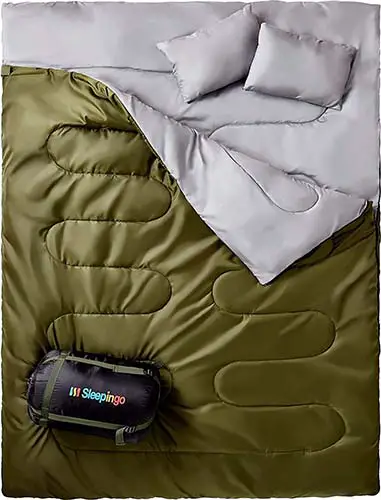
Sleepingo Double Sleeping Bag for Backpacking (Amazon)
Pack your Sleeping Bag Inside
The best way to pack a sleeping bag is to do it from inside, and you may have seen tons of travelers loading their packs with sleeping bag moving from one place to another.
But there is A PROBLEM!
Packing your sleeping bag does not exclude keeping it dry until when required. It will be a wasted effort to open your sleeping bag only to realize it is damp after spending several hours hiking and carrying it behind your back. That is certainly not what you want. The whole essence would be defeated if wet, and that could leave a sour taste in your mouth.
With an internal frame, the sleeping bag will go right inside. Ensure that the sleeping bag is rolled up tight, making it compact as much as possible. So it doesn’t get wet, pack it in a black garbage bag.
While you pack your stuff into the pack, this goes at the base. A few sacks have internal straps to pack it considerably further, and this gives you a lot of space for the remaining part of your gear. A few bags get rid of the straps entirely and have a different compartment for the sleeping bag. Many people are enticed to pack extra footwear in this, yet we propose you use it for the reason it was designed for because keeping your sleeping bag dry is very essential.
1. Use Straps and Loops to your Advantage
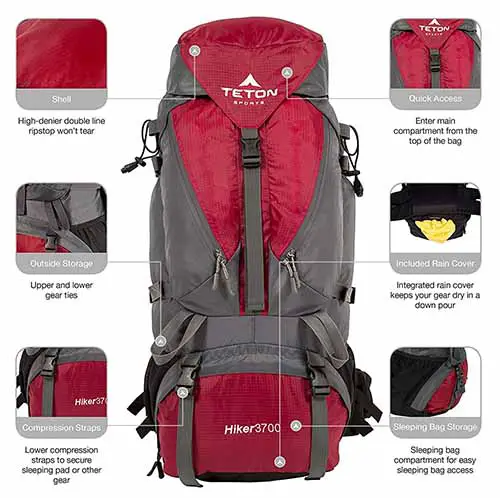
Teton Hiker3700 Backpack (Amazon)
This strategy requires your backpack to have either loop or stuffing sack straps. A lot of packs feature loops on the back panel. However, several individuals, once in a while, use it and most don’t have inkling to what they are used for. To use them is easy; get those straps passing through the loops, and you can now pull the bag up.
Be that as it may, this can only be accomplished with backpacks that come with this feature. The choice you are left with is to purchase the straps independently or get another pack entirely.
It is important to state at this juncture that while buying another, ensure that the backpack is waterproof, so you don’t have to consider purchasing a waterproof case pretty much later.
2. Tying the Sleeping Bag to an External Frame
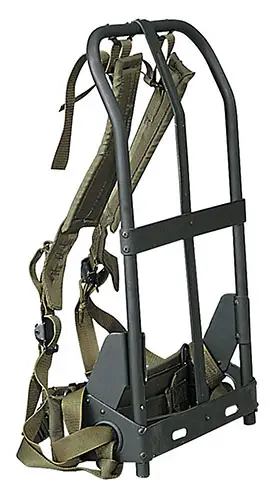
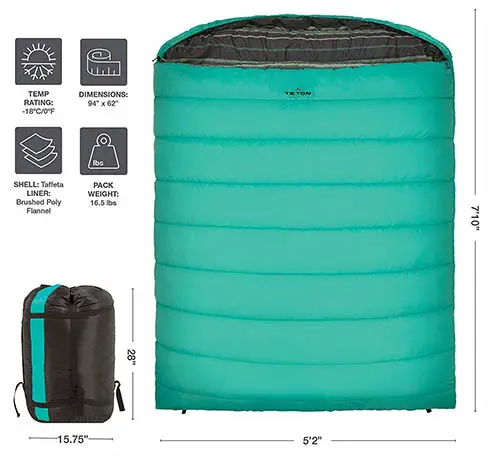
A.L.I.C.E. BackPack Frame (Amazon) TETON Sports Mammoth Sleeping Bag (Amazon)
Many people lean toward external frames and internal ones because it keeps up the structure of the backpack and offers better overall support. This trick is helpful for it utilizes the tie points at the bottom of the pack. You may have seen these on some backpack; however, nobody clarifies what they are used for.
You will locate straps close to the tie points, and this is mainly for securing the sleeping bag in place. In a case the bag is hanging from the pack, it will cause unevenness while you walk, and later on, you could experience neck and back pains. This is the first step to attaching a sleeping bag to a backpack.
3. Leverage Buckles
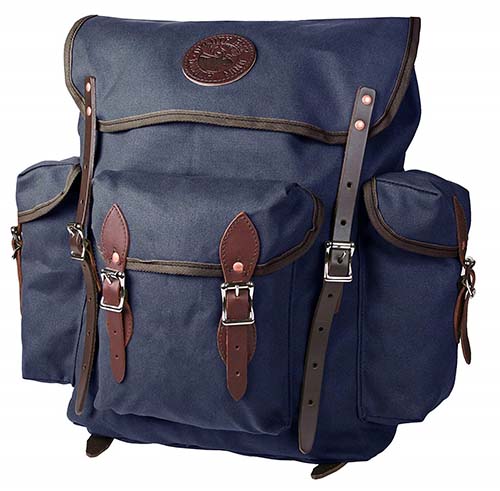
Duluth Pack Wanderer (Amazon)
If you do own an old backpack that comes without compression buckles on the back panel and you’re not willing to replace it just yet, this trick will come handy. Also, you will wonder why you didn’t consider it before now.
Compression buckles become useful in those occasions when you have filled your backpack as they secure space and tighten the bag in the process, avoiding sway and making the pack steady. Usually, these buckles are on the sides of the packs, and that is a smart way of securing your sleeping bag.
This will work because the buckles are well-spaced out at the edges of the backpack, making it perfect for securing the pack and preventing it from swinging. With your sleeping bed secured in this manner, its weight—even though it’s irrelevant in most cases, it can upset the balance of the backpack—is evenly distributed.
4. Lid on an Internal Frame
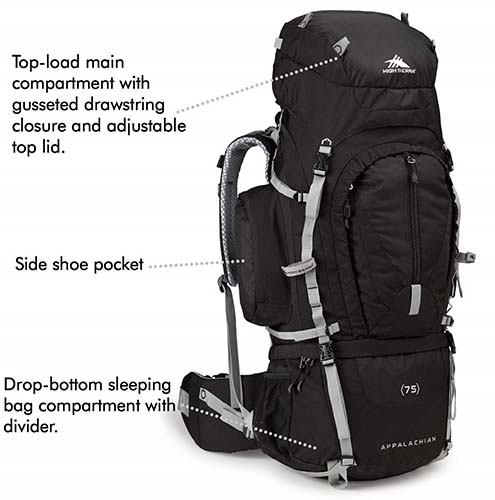
High Sierra Appalachian 75 Internal Frame Backpack (Amazon)
Several folks believe internal frames are complicated—they take the shape of a cylindrical chamber, where you heap things over one another. Imagine if you have stuffed your toothbrush halfway down the pack; you will have to reach for it, and you know what that means. This takes a great deal of time and may frustrate you—not to consider the disruption it will cause to the orderly arrangement you had going on before it happened.
So many bags come with a lid on top alongside attached strings for tightening as the load is filled. As the backpack is ready to be carried, you’ll do it with convenience and experience no discomfort.
While using the same string, your sleeping bag could be attached to the top of your backpack. Place the sleeping bed on top, and tighten it up. Doing such would create a space between the lid and your pack. This space will ordinarily not mean anything. However, it opens your bag to moisture. So while this strategy is excellent, you will need a nylon cover to prevent an attack from the weather elements.
5. You need to Improvise
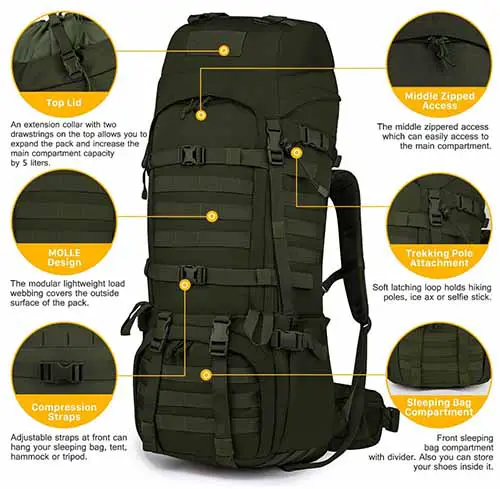
Mardingtop Internal Frame Hiking Backpack (Amazon)
Consider the possibility that you have an old sleeping bag without any bell and whistle—it is without straps, but loops. Some people have no clues to what loops and straps represent, languishing in ignorant bliss for several years and still counting. Thus, they go unused for a considerable length of time. Why neglect valuable resources that can be used to your advantage to go down the drain?
Maybe it is time to start using them as the following information will open your eyes to the purposes of loops:
|
In case the loops are by the side of the bag, they are specially for hanging it out to dry. Hanging it out to dry is a better option than laying it out since it will keep up the loft where the insulation is.
As that goes out of the way, we will disclose to you the easiest way to attach these to your pack. Take four separate bits of twine, and have two of them tied around the sleeping bag, to form loops. Use the other two strings and attach to your sleeping bag and have it secured to your backpack.
Again, you can decide to use strap buckles—buy them to fulfill this purpose—if you feel comfortable using them. Ensure the sleeping bag is secure against your backpack—it shouldn’t dangle.
Where do you tie the Bag—Top or Bottom?
This is a good question to ask, but it depends on what you prefer and mostly on where the straps and loops are located on the backpack. Most backpack lovers will reveal to you that the bag is better carried on the top area, and the reasons are as follows:
After covering several miles by foot, you may need to put your pack down. If the bag is attached beneath the backpack, dirt and dust may interfere with it. Also, most sleeping bag covers are made from nylon, and if it comes in contact with earth repeatedly, it will wear out much quicker. And in this way, it could harm the sleeping bag.
Your bag may likely come in contact with branches and bushes, and that means it may end up being scratched, which adds more damage to the bag.
For those carrying a heavy sleeping bag, they will do well having it on the top part of the pack, so they don’t experience pain in the lower part of their back. Again, it all boils down to personal preference—so carry as it fits.
How do you tell Internal or External Frame?
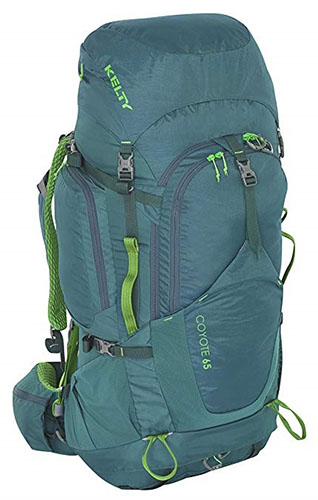
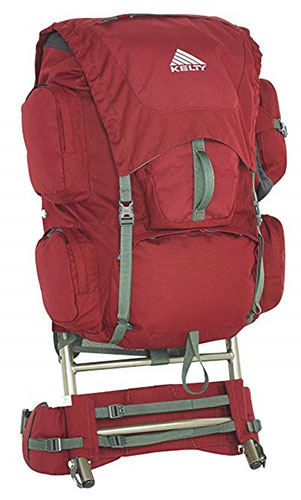
Kelty Coyote 65 Internal Frame (Amazon) Kelty Trekker External Frame (Amazon)
It is a no brainer to figure this out. You can tell by just looking at it or touching it. They differ in looks. External frames come in square shapes and can carry larger equipment more than the internal ones. They features more frames and are now being replaced using lighter materials.
When it comes to internal frames, they’re lightweight and come with a lid and are usually slim. As soon as you master attaching a sleeping bag to the backpack, the mode of attachment becomes irrelevant—either internal or external. The internal frame may be a better option to go with considering you have to walk miles with the backpack fully secure behind you.
Storing the Sleeping Bag—the Right Way
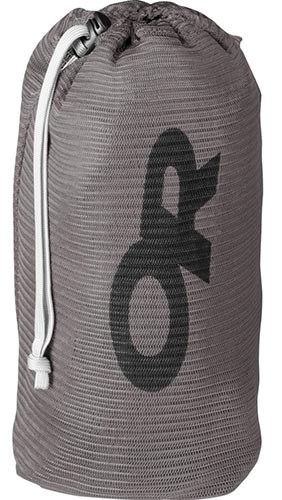
Outdoor Research Mesh Ditty Sacks (Amazon)
Taking care of your sleeping bag after the camping trip is essential, otherwise, there will be no sleeping bag to use when next you go on a trip. If the stuffing inside the bag is too tight, it may loosen up. And that may pose a lot of problem down the road—especially in the middle of your camping.
Storing your sleeping bag shouldn’t be that hard. Find a mesh bag so your bag can breath—or even go for a cover altogether. You may also fold it loosely and do it like when you’re storing a quilt. Never store it in an attic or basement; a closet will do—like you would with your clothes. That way, it looks refreshing as when you just purchased it and it will last the test of time and ready any time you want to use it.
The techniques explore here are by no means exhaustive—only a few have been treated here about how to attach a sleeping bag to your backpack. If your pack comes with no straps, you can improvise—use strings in place of straps or to form straps. Modern packs now come with compression buckles to make it compact and allow you secure the bag in place.
Having a memorable camping experience has so many sides to it—and securing your backpack in place with a sleeping bag attached to it without causing discomfort is one side. If you can master the skill of attaching your sleeping bag on your backpack, all things being equal, trust me, you will want to go camping as frequently as you can. Don’t let that bag ruin your camping experience—it can be pretty frustrating when it does.
You may also like: